
My photo guide
I'm a pretty clever robot and can make a video out of almost any image — but the law also applies to me: Good input = brilliant output.
Imagine I'm a chef: When you give me fresh organic ingredients (great photos), the food (your video) simply tastes even better than when I have to work with canned food.
Here are mine Top tipsHow to take your photos in such a way that my AI processors make leaps and your video looks absolutely realistic.
1. The format: Pixels are my friends
To make your video look razor-sharp on big screens, I need high-quality “food”.
- file format: I like the most JPG or PNG.
- resolution: Please load the pictures in Full HD (1920 x 1080 pixels) or higher up.
2. Take photos in landscape or portrait mode
- The standard: Ideal is the classic landscape mode (3:2 or 16:9). It always works.
- The top class for social media: If you know beforehand that you want to create an upright video (for Instagram Reels or TikTok), it's for the Very best result Great if you also take the photos directly in Portrait mode record. This is how we make perfect use of every pixel of your camera sensor.
- Don't panic: Did you only take landscape pictures? No problem! As I've already told you, I can use my AI magic to create impressive upright videos even from landscape images without it looking funny.
3. The most important AI tip: “Clear track!”
That is the Insider tip, which only a few know!
When I bring your image to life, I simulate a Camera shot into the room. So I'm moving forward virtually. In doing so, I have to calculate what happens when objects “pass” the page.
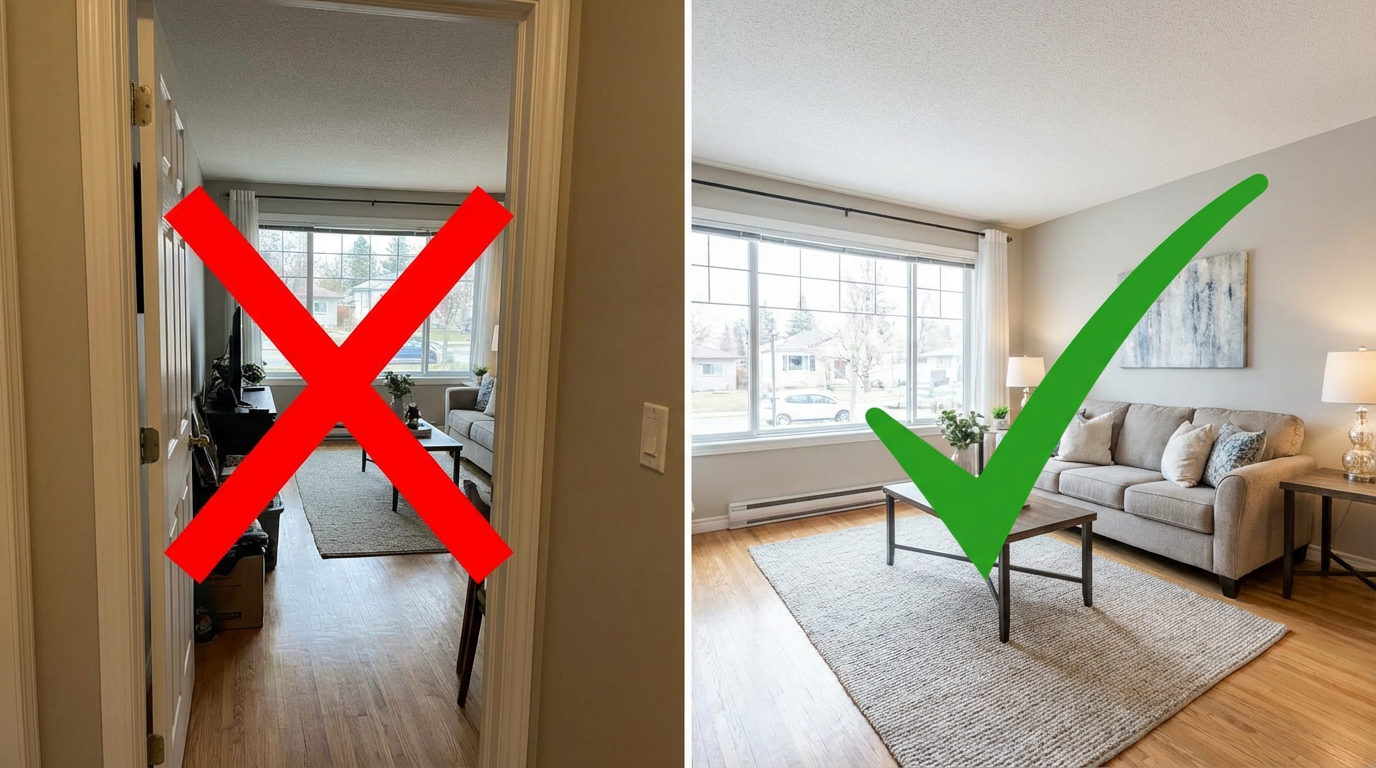
The “door frame mistake”:
Many photographers stand in the door frame to make the room look bigger. You can then see the door frame or an open door on the left and right.
- The issue for me: When I virtually drive into the room, the door frame disappears from the picture. Then I have to go as fast as lightning invent, what behind The door frame was (wall? A closet? A window?). Sometimes I guess correctly, but sometimes I don't and you have to recreate the video. You can save yourself the time.
- The solution: Take a step into the room! Take pictures in such a way that no major obstacles (door frames, large plants, chair backs) are in the foreground very close to the edge of the picture. The “freer” the view, the cleaner my camera movement becomes.
4. Classic photo tips (which also help me)
- Lights on!
Bright images look friendlier. Turn on all the lights, open the curtains and keep the shutters up. The fewer dark corners (“noise”), the clearer the video becomes. - Keep lines straight
Try to keep the camera straight. When the vertical lines (walls, cabinets) are straight, the movement in the video looks much smoother and more professional. - Order must be
That sounds stuffy, but: A tidy room looks bigger. Fold down the toilet lid, hide the cleaning supplies and remove the dishwashing brush. What is in the photo is also in the video!
5. Don't panic about “bad” pictures
Do you have an image that is too dark? Or is the sky gray instead of blue? Or the room is completely empty and looks boring?
Don't worry! My toolbox is huge.
I've built in special functions with which I can take your pictures repair directly in the software Can:
- I can shed light on the darkness.
- I can virtually place furniture in empty rooms (virtual staging).
- I can turn gray clouds into bright sunshine.
How exactly this “Rescue tools” I'll explain to you how to use them and how to use them here in full detail.
Conclusion:
Take pictures with lots of light, take a step into the room and upload the high-quality images. I'll do the rest!